What You Really Need To Know Before Starting Home NPWT
Making the move from hospital-supervised care to managing negative pressure wound therapy at home can feel like a big deal. It's completely normal to be excited about heading home but also a bit nervous about this new responsibility. The good news? You’re definitely not alone. Thousands of patients make this transition successfully every month, and many discover it’s a major turning point in their healing.
The day-to-day reality of home NPWT is often far more manageable than people first think. It marks a change in your role—from being a passive patient to becoming an active, empowered partner in your own healing. This shift can be incredibly motivating once you get the hang of it. Let's break down what home therapy actually looks like so you can start with confidence.
Are You Truly Ready for Home NPWT?
Before you jump in, it’s a good idea to have an honest chat with yourself and your healthcare team. Being a good candidate for home therapy isn't just about your wound; it’s about your whole situation. Here’s what to consider:
- Your Physical Ability: Can you handle the device and supplies? Will you be able to do the dressing changes yourself, or is there a reliable caregiver who can help? You'll need some dexterity and a bit of strength.
- Your Home Environment: You’ll need a clean, dedicated spot to keep supplies and change dressings. Is your home set up for this? Think about potential challenges like pets, small children, or general clutter.
- Your Support System: Who’s in your corner? Having a friend, family member, or visiting nurse to call when you're feeling stuck can make all the difference. Emotional support is just as vital as physical help.
- Your Mindset: Are you prepared to learn something new and be patient with the process? There's a learning curve, and that’s okay. A positive, problem-solving attitude is one of your best assets for healing.
Setting Realistic Expectations for Your Journey
One of the biggest roadblocks patients run into is having unrealistic expectations. Healing isn't always a straight line. Some days will feel like a huge win, while others might feel like a small step back. Knowing this from the start helps you stay motivated. Remember, even slow progress is still progress. For more insight into the healing process, you can check out our guide on how to heal deep wounds faster.
It’s also important to get familiar with the equipment you'll be using. The idea of negative pressure wound therapy at home is possible because of huge leaps in medical technology. The bulky, loud machines you see in a hospital have been replaced with small, portable, and often single-use devices. These modern systems are designed for patient mobility and simplicity, running on batteries to give you more freedom. You can learn more about the growth of these user-friendly devices to see just how far the technology has advanced.
Committing to this therapy means building a routine, learning to listen to your body, and keeping an open line of communication with your clinical team. Think of it as a partnership where you are the most important player. With the right preparation and attitude, you're not just managing a wound—you're taking charge of your recovery.
Picking The Right Equipment And Getting It Working
The world of negative pressure wound therapy at home can seem like a lot to take in, with so many different devices and supplies to get a handle on. Honestly, trying to figure out which system is best for you can feel overwhelming. The trick is to match the equipment not just to your wound, but also to your lifestyle and what your insurance covers.
Disposable vs. Reusable Systems: What's the Difference?
Your first big choice will probably be between a single-use (disposable) NPWT device and a more traditional reusable system. They both do the same job—applying controlled suction to help your wound heal—but they get there in slightly different ways.
- Single-Use Devices: These are typically smaller, lighter, and much simpler to use. Think of them as the "grab-and-go" version of NPWT. They usually run on batteries, are worn for a specific time (often a week), and then you dispose of the whole unit. They're a great fit for people who are up and about or have smaller wounds that don't drain much. Their simplicity also means there's less of a learning curve.
- Reusable Systems: These are more like the machines you might see in a hospital, just made smaller and more portable for home use. You'll keep the main pump unit for your entire therapy period, and a medical supply company will send regular shipments of disposable items like canisters, dressings, and tubing. These are often the better choice for larger, deeper, or more complicated wounds that need stronger suction or have a lot of drainage.
Which one is right for you? That’s a conversation to have with your healthcare provider and your durable medical equipment (DME) supplier. They'll look at your wound’s needs and your insurance plan to point you toward the best option.
To give you a clearer picture of what to expect from different home NPWT options, here's a comparison of some popular devices.
| Device Type | Battery Life | Weight | Wound Applications | Key Features |
|---|---|---|---|---|
| PICO 7 (Single-Use) | Up to 7 days | 0.2 lbs | Small to medium low-exudate wounds, closed surgical incisions | Ultra-portable, canister-free design, quiet operation |
| Invia Liberty (Reusable) | 10-14 hours | 2.4 lbs | Medium to large high-exudate wounds, grafts, flaps | Touchscreen interface, multiple pressure settings, large canister options |
| ActiV.A.C. (Reusable) | 14 hours | 2.4 lbs | Chronic, acute, and traumatic wounds, diabetic ulcers | Portable design with carrying case, SensaT.R.A.C. Technology for pressure monitoring |
| RENASYS GO (Reusable) | 20 hours | 2.4 lbs | Wide range of wound types, including pressure injuries and abdominal wounds | Longest battery life in its class, intuitive controls, multiple alarms for safety |
This table shows that single-use systems like the PICO 7 prioritize portability, while reusable systems such as the RENASYS GO offer longer battery life and are built for more demanding wounds. Your choice will depend on balancing mobility with the clinical needs of your wound.
The infographic below shows just how much of a difference this therapy can make compared to standard wound care, looking at things like healing speed and patient satisfaction.
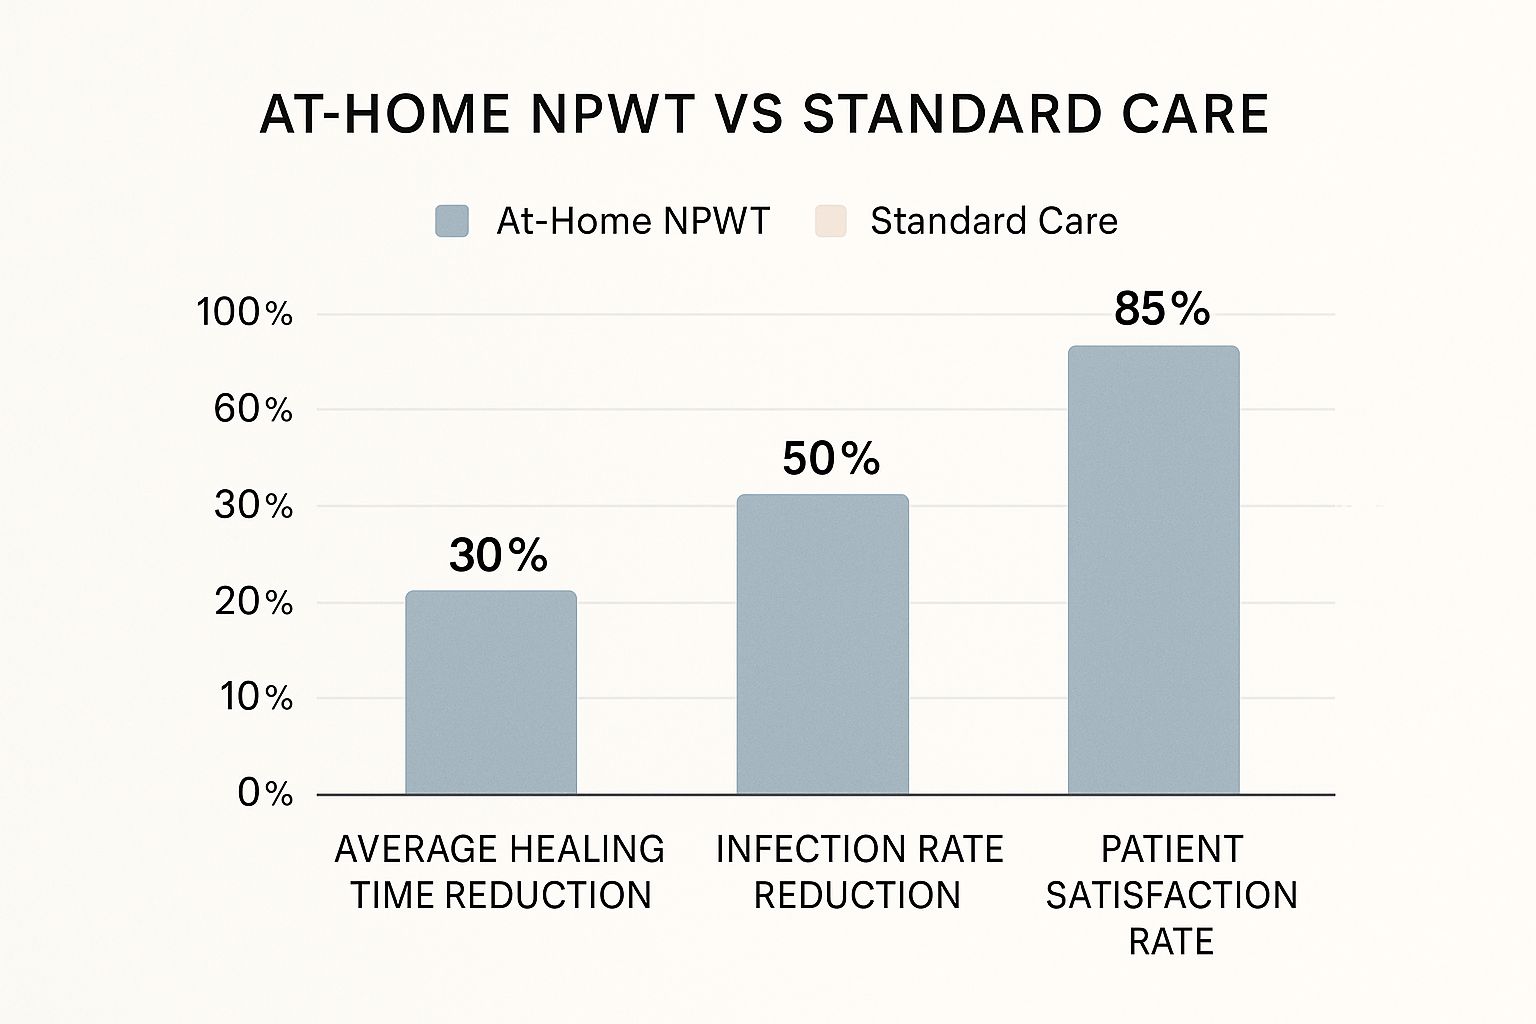
As you can see, the numbers speak for themselves. With an 85% patient satisfaction rate and major drops in healing time and infection risk, home NPWT is a powerful tool.
Creating Your Home Healing Station
Once the boxes arrive, it's time to get your space set up for success. You don't need to create a sterile operating room, but a bit of organization will make your life much easier. Find a clean, dedicated spot—like a small table or a clear corner in your room—to keep your supplies. It’s best to keep everything in its original packaging until you’re about to use it.
Here’s a practical tip I always share: get a small basket or bin and create a "dressing change kit." Every time you need to change your dressing, you can just grab the basket, knowing everything you need is right there. Your kit might include:
- Sterile gloves
- Saline solution for cleaning the wound
- Gauze pads
- The special foam dressing
- The clear adhesive film (also called a drape)
- Scissors (only for cutting the film, never the foam)
- The suction tubing and its connector
Putting a system like this in place can turn what feels like a stressful medical task into a simple, manageable part of your routine. You can find more ideas for creating a supportive healing space in our resources on at-home wound care. The goal is to make negative pressure wound therapy at home feel like a normal part of your day, not a major disruption.
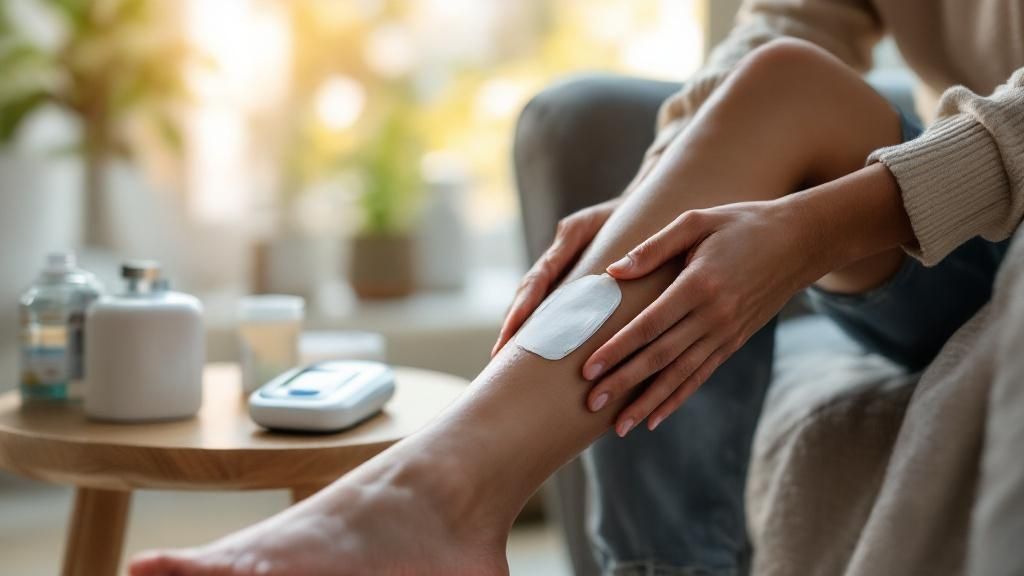
Getting Your Wound Ready And Applying Dressings Like A Pro
This is where the real work of negative pressure wound therapy at home begins. Getting the dressing right isn't just another task on the list; it's the foundation of your entire therapy. A perfect dressing application ensures the machine can do its job, pulling fluid away from the wound and encouraging new tissue to grow. Let's walk through how to prepare your wound and apply these specialized dressings with confidence.
Before You Begin: Assessing Your Wound
Before every dressing change, take a moment to be an observer. What you see can tell you a lot about how your healing is progressing. While you're not expected to be a doctor, you are the person who sees your wound the most often. Look for positive changes, like the wound bed developing a healthy, bright red color or the edges slowly closing in. These are signs of granulation tissue, which is the new tissue your body builds to fill the wound.
At the same time, stay alert for anything that seems off. Is there a new or worsening odor? Has your pain level changed unexpectedly? Is the drainage a different color or much heavier than usual? These are your cues to pause and call your healthcare provider. Your observations are valuable information that helps them guide your care. Think of yourself as a key member of the healing team, providing crucial reports from the field.
The Cleaning and Prep Phase
After assessing the wound, the next part is getting it clean and prepped for the new dressing. Your provider will give you specific instructions, but the process usually involves gently cleaning the wound and the skin around it with a sterile saline solution. The main goal is to remove old drainage and debris without hurting the delicate new tissue that's forming. This careful approach is quite different from other methods; for comparison, you can see how wet-to-dry dressings are performed correctly to understand the contrast.
Once clean, you have to make sure the skin around the wound is completely dry. This is absolutely essential for getting a good seal with the adhesive film. Any moisture, lotion, or ointment on the surrounding skin will stop the drape from sticking properly, which will cause air leaks and set off the device alarms. A simple but effective trick is to use a skin prep wipe on the healthy skin right around the wound's edge. It creates a slightly tacky surface that helps the adhesive film stick like glue.
Applying the Dressing: Tips for Success
Applying the dressing itself can feel a bit like an arts and crafts project at first. The black or green foam dressing needs to be cut to fit the exact shape of your wound. It should fill the space snugly but without overlapping onto your healthy skin, as that can cause irritation.
Here are a few insider tips that can make a huge difference:
- Trace the Shape: Place a piece of the clear film over your wound (before peeling off the backing) and trace its outline with a marker. You can then use this as a template, placing it over the foam and cutting it out for a perfect fit.
- Handle Irregular Shapes: For wounds with tunnels or uneven depths, you might need to use several small pieces of foam to fill all the nooks and crannies. The most important thing is to make sure all the pieces are lightly touching so the negative pressure is spread evenly.
- Achieving a Perfect Seal: When you apply the clear adhesive film, start from the center and smooth it outwards to prevent wrinkles. Wrinkles are the number one enemy and the top cause of air leaks. If you get one, you can often "patch" it with a small, extra piece of film.
The effectiveness of NPWT comes from the sub-atmospheric pressure it creates. This therapy applies gentle suction, typically around 125 mmHg below ambient pressure, to the wound through the sealed dressing. This controlled vacuum is what pulls fluid away, brings down swelling, and promotes faster healing. To learn more about how this works, you can explore detailed market insights on the principles behind negative pressure wound therapy. Mastering the dressing application ensures this pressure is maintained, making your therapy as effective as it can be.
Running Your Device Without The Guesswork
Once your dressing is perfectly sealed, getting the hang of your negative pressure wound therapy at home device is the next step. It might seem intimidating at first, but think of it like learning to use any new piece of tech. Soon enough, it will feel like a simple part of your daily routine, and this guide will help you understand what all the lights, sounds, and readings actually mean.
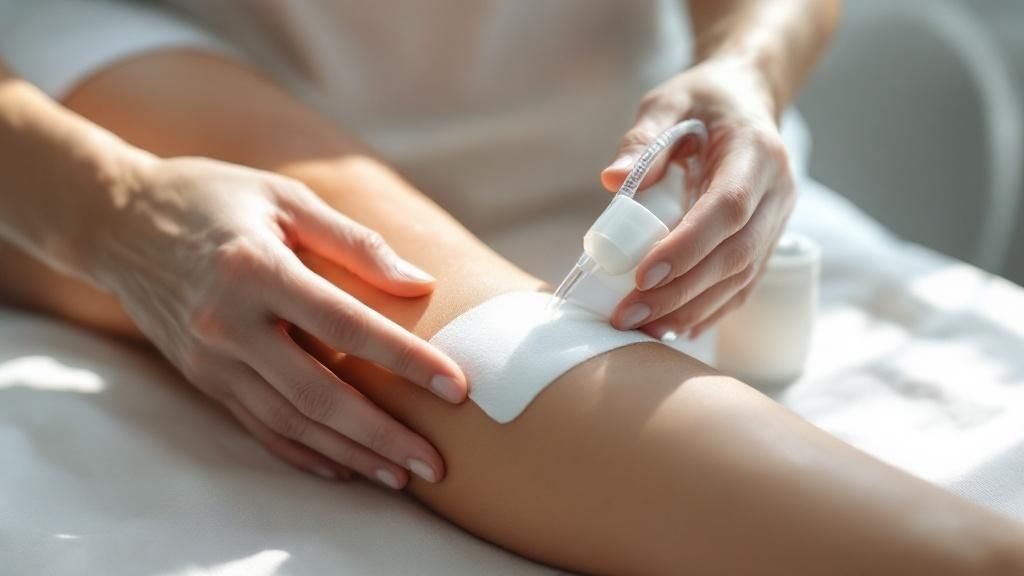
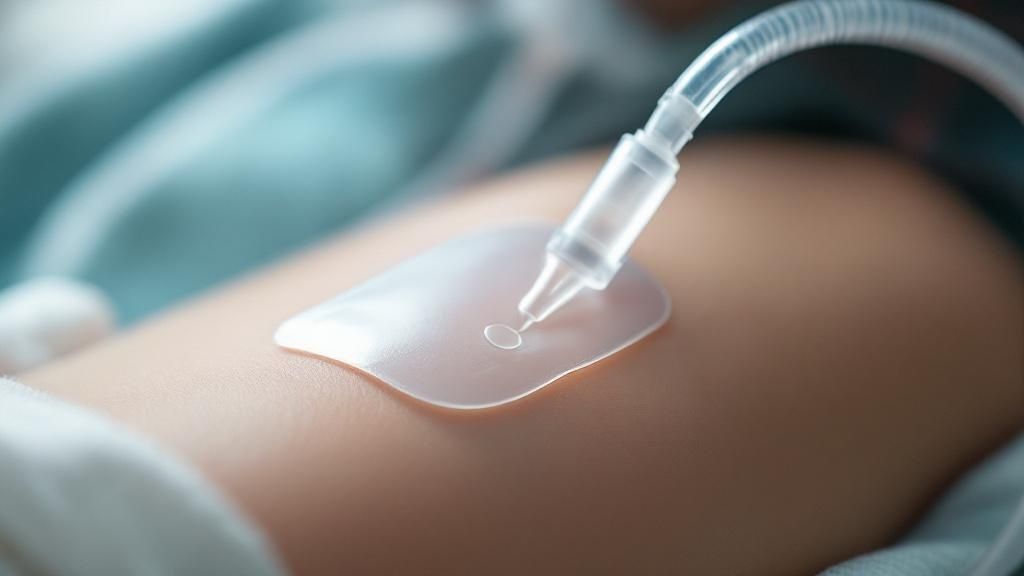
In this picture, you can see how the clear film covers the foam dressing. The tubing connects the wound site to the portable pump, which creates and manages the suction needed for healing.
Getting a Therapy Session Started
Starting a session is usually a breeze. After connecting the tubing from your dressing to the device, you’ll power it on and select the pressure setting prescribed by your doctor. You don't need to memorize this—it will be clearly written in your care plan. The machine will hum to life, pulling air from the dressing until it hits the target pressure. This usually takes just a minute or two. A solid green light or a stable pressure reading on the screen is your sign that everything is good to go.
You might hear your doctor mention two types of therapy settings. Here’s what they mean:
- Continuous Therapy: This is the most common approach. The device maintains a steady, constant level of negative pressure 24/7. It’s fantastic for managing heavy drainage and giving your wound consistent stimulation to promote tissue growth.
- Intermittent Therapy: With this setting, the device cycles between applying pressure and pausing (or using a lower pressure). For instance, it might be on for five minutes and then off for two. This on-off cycle can sometimes help encourage blood flow for certain kinds of wounds. Your healthcare provider will determine if this is the right choice for you.
Decoding Your Device's Feedback
Your NPWT machine is designed to talk to you through its lights and alarms. Learning its language is the key to feeling confident and in control.
| Device Status | What It Means | Your Next Move |
|---|---|---|
| Normal Operation (e.g., solid green light) | The machine is holding the correct pressure. Your dressing seal is secure. | Great job! You can relax, knowing your therapy is working correctly. |
| Low Pressure/Leak Alarm | This is the most frequent alert. It simply means air is getting into the dressing somewhere. | Gently check the entire dressing for wrinkles or lifted edges. Smooth down the film and use small "patch" pieces of adhesive to seal any leaks you find. Also, double-check that the tubing is clicked in securely at both the dressing and the canister. |
| Canister Full Alarm | The canister that collects fluid from the wound has reached its limit. | It's time to change the canister. Just follow the steps your provider showed you. This typically involves clamping the tube, swapping out the full canister for a new one, and then unclamping the tube. |
| Low Battery Alarm | The device is running out of power and needs to be charged. | Plug it into its charger right away. Most pumps can keep running while they charge, so your therapy won't be interrupted. |
It's helpful to think of these alarms not as problems, but as useful notifications. They exist to ensure your therapy stays on track. Keeping a simple log of your sessions, canister changes, and any alarms can be a game-changer. Just jot down the date, time, and what was happening. This log becomes an invaluable tool when you chat with your healthcare team, as it gives them a clear, specific picture of how your negative pressure wound therapy at home is progressing.
Tracking Progress and Spotting Problems Early
When you're managing negative pressure wound therapy at home, you become the most important advocate for your own healing. It’s all about learning to recognize what's normal and trusting your gut when something seems off. Since you see the wound every day, you're in the perfect position to notice small changes that signal progress or potential trouble.
A great habit is to keep a simple journal or use a notes app on your phone. Jot down a few observations or snap a quick photo before each dressing change. This creates a powerful visual timeline, which is not only incredibly helpful for your healthcare team but also gives you tangible proof of your progress. Seeing that progress is a fantastic motivator, especially on days when healing feels slow. This active role is a key part of a successful recovery and is linked to better results. You can read more about how patient involvement improves results in home health wound care patient outcomes.
Recognizing the Signs of Healing
It’s truly rewarding to see your body repair itself. As you get more familiar with the process, you'll start to spot the positive signs that your NPWT is working and your wound is on the right track.
- Healthy Granulation Tissue: Look for a wound bed that appears beefy red or bright pink with a slightly bumpy, textured surface. This is granulation tissue, the new connective tissue and tiny blood vessels that your body creates to fill the wound.
- Decreasing Wound Size: The wound should gradually get smaller and shallower over time. Taking a quick measurement of its length and width once a week is a simple way to track this.
- Wound Edge Approximation: Pay attention to the edges of the wound. You should see them start to pull closer together, which is a clear indicator that the healing process is moving forward.
- Reduced Drainage: As healing progresses, the amount of fluid (called exudate) the wound produces should decrease. The fluid should also become clearer, shifting from a cloudy or pinkish color to a light, straw-colored liquid.
When to Pause and Call Your Provider
Knowing when to call for help is just as critical as spotting signs of healing. Never feel like you are bothering your provider—you are being a responsible partner in your own care.
The need for effective wound care is significant; in the U.S. alone, about 6.5 million people live with chronic wounds each year. This statistic shows just how many people rely on therapies like NPWT and highlights why proper monitoring is essential to prevent complications. You can find more information about the growing need for home-based wound care on strategicmarketresearch.com.
To help you stay on top of your healing journey, here’s a straightforward checklist. It outlines what to look for and when it's time to reach out to a professional.
Wound Healing Monitoring Checklist
Daily and weekly monitoring parameters for tracking NPWT progress and identifying potential complications
| Assessment Area | Normal Findings | Warning Signs | Action Required |
|---|---|---|---|
| Pain Level | Pain is stable or gradually getting better. Some discomfort during dressing changes is expected. | A sudden, sharp, or new type of pain that wasn't there before. | Call your healthcare provider immediately. |
| Drainage (Exudate) | Fluid is thin, clear, or light-yellow. The amount is decreasing over time. | Drainage becomes thick, cloudy, green, or has a foul smell. A sudden increase in volume. | Contact your provider; this could signal an infection. |
| Wound Edges | The skin around the wound is pink and flat. Edges are slowly pulling together. | Increased redness, swelling, warmth, or hardness around the wound. Red streaks on the skin. | This may be a sign of a spreading infection; call your provider. |
| Overall Feeling | You feel generally well, with normal energy levels. | You develop a fever, chills, nausea, or just feel unwell and run-down. | Seek medical advice promptly as this could indicate a systemic infection. |
The key takeaway is to trust your instincts. If something feels off, it probably is. Your observations are vital. By consistently monitoring your wound and keeping an open line of communication with your clinical team, you ensure your negative pressure wound therapy at home remains safe and effective, keeping you firmly on the path to recovery.
Solving Problems And Making Life Work Around NPWT
Even with the most careful technique, managing negative pressure wound therapy at home will have its moments that test your patience. This is completely normal, and pretty much everyone who uses NPWT has a story about something unexpected happening. Think of this section as your guide for getting through the most common hiccups, helping you fit this therapy into your life, not the other way around.
Troubleshooting Common NPWT Annoyances
Let's dive into the most frequent frustration: the air leak alarm. You're sure you've done everything correctly, but the machine just keeps beeping. Before frustration sets in, remember that most leaks are small and relatively easy to fix.
- Seal Failures: Often, the problem is just a tiny wrinkle or a lifted corner on the adhesive film. The first thing to do is run your fingers firmly along the entire border of the dressing. If you feel a loose spot, don't feel like you have to start over! Simply use a small, extra piece of the clear film to "patch" the area, much like fixing a small puncture on a tire tube.
- Difficult Locations: Wounds on awkward spots like heels, elbows, or near skin folds are known for being tough to seal. This is your chance to get a little creative. Wiping the surrounding skin with a skin barrier prep pad can create a much better surface for the film to adhere to. You can also use a "picture framing" technique by applying extra strips of adhesive film to reinforce all the edges.
- Excessive Drainage: Sometimes a wound produces more fluid than anticipated, which can fill the canister quickly or make the dressing feel waterlogged. If you notice this, it's time to call your provider. They might advise more frequent dressing changes or suggest a system with a larger canister.
Integrating NPWT into Your Daily Life
Living with a portable medical device definitely requires some adjustments, but it doesn't mean you have to put your entire life on pause. A little bit of planning can make navigating your daily routine feel almost normal.
| Activity | Practical Tips and Solutions |
|---|---|
| Showering | Your device is not waterproof and must be kept away from water. Before you hop in the shower, you'll need to disconnect the tubing from the dressing. Your provider will show you exactly how to do this safely, which usually involves clamping the tube. The dressing itself can often get wet, but always double-check with your supplier. After showering, gently pat the dressing dry before reconnecting the device. |
| Sleeping | For light sleepers, the constant hum of the pump can be a real nuisance. A simple trick is to place the device on a soft surface, like a pillow or a folded towel, at the foot of your bed to absorb some of the vibration. Also, make sure the tubing has plenty of slack so you can turn over in your sleep without pulling on the dressing. |
| Leaving the House | Most modern NPWT pumps are designed for life on the go and come with a discreet carrying case or shoulder bag. This makes running errands or even going to work much more manageable. Just be sure to plan your battery charging around your schedule so you have plenty of power while you're out. |
Staying Positive Through the Ups and Downs
The emotional journey of long-term wound care is just as significant as the physical one. You'll likely have days where progress feels slow, and it's easy to feel discouraged. This is where building a strong support network becomes so important. Lean on your family and friends, and don't be afraid to look for online patient communities. Talking with others who truly understand what you're going through can make a world of difference.
The fact that this therapy is increasingly used at home is part of a larger shift in healthcare. The global market for negative pressure wound therapy was valued at about USD 2.49 billion in 2023 and is projected to reach USD 3.87 billion by 2030. This growth is driven by the real-world success of people managing their recovery at home. You can read more about the expansion of the NPWT market on grandviewresearch.com.
Don't forget to celebrate the small wins—a wound that's a tiny bit smaller, a full day with no alarms, or just feeling well enough to enjoy a favorite hobby. Every small step forward is a victory. By tackling challenges as they come and finding smart ways to make negative pressure wound therapy at home fit your lifestyle, you remain in control of your own healing journey.
Key Takeaways For NPWT Success
Getting the hang of negative pressure wound therapy at home is all about small, consistent actions that build confidence. You are the most important person on your healing team, and this process is less about getting it perfect and more about sticking with it and solving problems as they come up. Let's break down the essentials into quick, actionable takeaways.
Your Daily Routine Checklist
Consistency is your best friend when it comes to wound care. When you make it a daily ritual, you build habits that pave the way for successful healing. It doesn't have to be complicated; just think of it as a non-negotiable part of your day.
- Morning Check-In: Start your day with a quick look at your device. Is the light green? Does the dressing seem secure? This simple glance can stop a small issue from turning into a real headache.
- Supply Management: Always check your supplies before you're about to run out. Keep a mental or physical list of what you have and what you'll need soon. This helps you avoid the stress of realizing you're out of adhesive film or a canister at the last minute.
- Log Your Progress: Take a moment to jot down a few notes. Write down the date, how much drainage is in the canister and what color it is, and any changes you notice in the wound itself. This log is incredibly helpful when you talk to your healthcare provider.
Communication and Empowerment
Your role isn't just changing dressings—it's being your own best advocate. A solid line of communication with your clinical team means you’re never truly on your own.
Don't ever feel shy about reaching out if something feels off. A new alarm sound, a change in your pain level, or a dressing that won't seal properly are all perfectly good reasons to make a call. When you do, providing clear, specific details from your daily log helps your provider give you the most accurate advice. Remember, successful patient involvement is a huge factor in how well you heal. Many people find that managing their own care helps them recover faster. You can find out more by exploring our insights on how home wound care speeds up recovery.
Celebrating Your Progress
Healing is a marathon, not a sprint, so it's important to celebrate the wins along the way, no matter how small they seem.
- The first time you successfully change a dressing all by yourself.
- Making it a full 24 hours without a single device alarm.
- Looking at the wound and noticing it’s visibly smaller than last week.
- Feeling well enough to go for a walk or enjoy a meal out with friends.
These little victories are what keep you motivated and remind you that all your hard work is making a difference. Taking an active part in your negative pressure wound therapy at home isn't just about closing a wound; it’s about taking back your independence and getting back to the life you love.
If you're ready to take charge of your healing journey with expert support right in your home, the team at Rapid Wound Care is here for you. We deliver personalized, professional wound management to ensure you have the guidance you need. Contact Rapid Wound Care today to see how we can support your recovery.